Your best friend for file transfer.
 Fetch
Fetch
 Fetch Help > Fetch Tutorial > Uploading Webpages
One common use for Fetch is uploading files to web servers. Web authors often create their HTML, GIF, JPEG, etc. files on a Macintosh, and use Fetch to transfer the files to the computer that will actually serve the files over the Internet. Adding an image file to an eBay item description is similar: the image is first uploaded to a web server, and then a reference to the image is added to the item description. (See the Uploading pictures for eBay help topic for more information.) This tutorial topic walks you through your first such transfer. If you want more information, you can read the other tutorial topics, but they are not necessary for following along with this topic.
If you are using iWeb to create your website, you should also read the Using Fetch with iWeb help topic for instructions and tips specific to iWeb.
Before you start, you need to gather three important pieces of information:
- The hostname of the server that will hold your pages. It should be something like "www.example.com". You don't want an entire adddress (such as "http://www.example.com"), just the hostname part.
- Your username, that is, the name which you use to sign on to the server. Your username is usually a sequence of letters or numbers (such as "jsmith"), and may be the characters to the left of the "@" in your email address. It should not be confused with an email address, as your username usually won't include an @ sign.
- Your password. Again, this may be the same password you use for email or dialing in to your service provider.
If you do not have these pieces of information, the company that sells you the web server space (or the university that provides it for free) should be able to tell them to you.
You should also find out if your server uses FTP or the newer, more secure SFTP or FTP with TLS/SSL for connections. If SFTP or FTP with TLS/SSL is available you should use one of them, but not all servers support them yet.
To verify your website's contents after you've uploaded the files, you'll need to know the address (URL) that refers to your site. Once again, you can get this information from your service provider.
If you are creating and uploading a website with multiple files, we recommend that you keep all the files in the same folder on your Macintosh. Some HTML editing programs put images in a separate folder, but this makes it more difficult to keep the links between files correct. Moving files to a new folder will probably break some links and image tags; you should test to make sure they all work before uploading.
To start:
- Choose the New Connection command from the File menu.
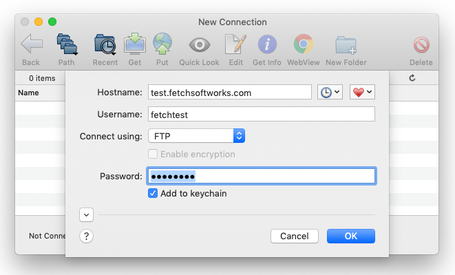
- Enter your hostname, username, and password in the appropriate text fields of the New Connection dialog.
- Possibly change the Connect using pop-up menu to SFTP or FTP with TLS/SSL if your server supports secure connections.
- Click the Connect button.
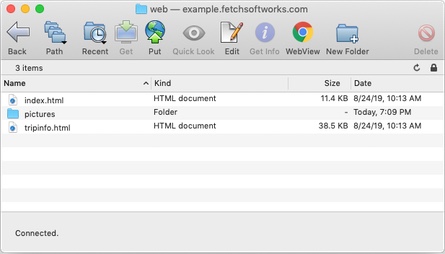
You should see a list of the files that make up your website.
Otherwise, you will need to correct one or more of the pieces of information you entered in the New Connection dialog.
If you've successfully connected to the server and are viewing the folder with your web files, you can choose New Shortcut from the Shortcuts menu to create a shortcut for future use. This shortcut will be added to the Fetch Shortcuts list; to use it later, choose it from the Shortcuts ![]() pop-up menu in the New Connection dialog (or choose it from the list of shortcuts in the Shortcuts menu).
pop-up menu in the New Connection dialog (or choose it from the list of shortcuts in the Shortcuts menu).
Once you're connected, click the Put button in the toolbar or choose the Put command from the Remote menu to upload your web files.

A dialog for selecting files appears.
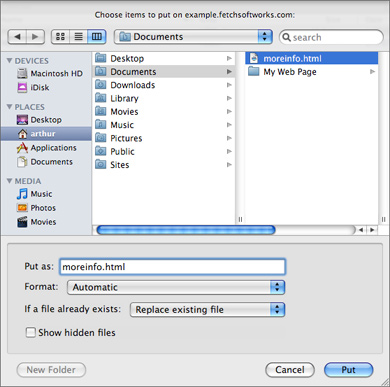
If all of the files are in one folder, you can navigate to that folder and select them all to upload. Select multiple files by holding down the Shift or Command keys when clicking. Otherwise, you can choose them one by one. You can also select folders. The dialog also offers several other options, such as what format to use for the transfer; the default choices of Automatic format and Replace existing files are usually what you want. Then click the Put button to begin the transfer.
Once the pages have been uploaded, you should verify them with a web browser, such as Safari, Netscape, or Internet Explorer. Enter your website's address in the browser's Address or Location field and check to make sure that all the images display correctly and that all the links work. If there are problems, double-check your HTML tags to make sure that they have the correct file references. Also, be aware of the particular requirements of your service provider. Some require that your main page be named "index.html", and some require uploading everything to a remote folder named "web" or "public_html". CGI scripts may need to go in a particular remote folder, and you may need to set their execute permission bit — see the viewing and setting permissions help topic.
After you've uploaded your webpages successfully, you may want to set up WebView, which lets you select files in Fetch and click the WebView button to view them in your web browser, and use the Copy Web Address command to copy the web address of those files. See the setting up WebView topic for more information.
End of tutorial — see Using Fetch for more guided topics