Your best friend for file transfer.
 Fetch
Fetch
 Fetch Help > Using Fetch > Scheduling automatic transfers with iCal
NOTE: Fetch 5.8 does not offer Automator support. The documentation below is only accurate for Fetch 5.7.7 and earlier. Automator support may return in a future release of Fetch.
While Fetch does not have a built-in scheduler, you can use iCal along with Fetch's Mirror command or Automator support to automatically upload or download files at a specified time every day or week.
iCal is a calendar and scheduling application that is part of Mac OS X. In iCal, you create events on a calendar to remind yourself of meetings, appointments, birthdays, etc. You can create events that occur just once, or events that occur on a repeating schedule, such as every day, every week on a certain day, or every Monday through Friday. For each event, you can specify an alarm. While this can be an alarm in the traditional sense, where your Macintosh plays a sound or displays a message reminding you of the event, an iCal alarm can also open a file, send an email, or run an AppleScript. By creating a repeating event with an alarm that opens a file, you can use iCal to schedule automatic transfers in Fetch.
Once you've set up an event, iCal doesn't even need to be open for the event, and thus the transfer, to happen. As long as your Macintosh is on (and not sleeping), the transfer will happen at the time you specified.
Setting up the transfer
First, you need to create a set of instructions telling Fetch what to do when the event's alarm goes off. Typically you want to do one of three things: mirror a folder, download certain files, or upload certain files.
If you want to transfer a whole folder, the easiest solution may be to create a mirror document with Fetch's Mirror command. The Mirror command transfers the contents of a local folder to a server folder. One benefit of the Mirror command is that it will only transfer the files that are new or have changed since the last time you mirrored the folder, saving you time. For more information and step-by-step instructions on creating a mirror document, see the mirroring a local folder to a remote folder help topic. When creating a mirror document for scheduled transfers, be sure to check the Mirror automatically when opened checkbox.
Downloading and uploading certain individual files is best accomplished by creating an Automator workflow that uses Fetch's Automator actions. For an overview of using Automator and instructions on creating simple workflows for uploading and downloading files, see the introduction to using Automator with Fetch help topic.
Scheduling the automatic transfer in iCal
Next, you need to create the event in iCal and attach your mirror document or Automator workflow to it.
- Open iCal (located in your Applications folder).
- Select the date you want the automatic transfer to start happening.
- Choose File > New Event. A new event will appear in the iCal window.
- Choose Edit > Edit Event, and the event editor will appear. When you are done following the steps below, the event editor should look something like this:
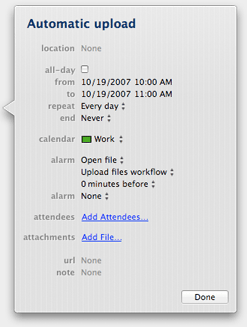
- Click the name at the top of the event editor, and enter a new name for the event so you can easily identify it later.
- On the from line, enter a start time by clicking the hour and minutes and typing in new times.
- Skip the to line, which specifies the end time. The end time isn't important when setting up an event to do automatic transfers.
- Skip the repeat line for now, but we'll come back to it.
- Next, click the triangles in the alarm line, and choose Open file from the pop-up menu. Two new lines will appear beneath the alarm line.
- Click the first line beneath the alarm line (most likely it says "iCal"), and choose Other from the pop-up menu.
- iCal will prompt you to select a file. Find and select the mirror document or Automator workflow that you created earlier.
- Then, in the next line, which typically says "15 minutes before," click the number and change it to "0", so that your alarm happens at exactly the start time specified for this event.
- A new, empty alarm line will appear once you have finished creating the first alarm, in case you want to set two different alarms for the same event. Usually you do not.
- Finally, return to the repeat line and click the triangles to specify how often you want the event and alarm to repeat. From the pop-up menu, choose every day, every week, or Custom (if you want the event to happen on some days of the week, but not other days).
- Once you've chosen a repeat schedule, the end line will appear. Usually you want to leave this as "Never," but if, for example, you want your automatic transfers to only happen during the next month, you can specify a date for the automatic transfers to end.
Your automatic transfer is now set up. If you want, you can view other days in the calendar to verify that the event has been added to all the dates specified.
If you want to set up more than one scheduled automatic transfer, repeat the steps above.
You can quit iCal, since events and alarms will trigger even when iCal isn't running.
When you want to turn off a scheduled transfer, open iCal, click the event for the transfer, and press the Delete key to remove it and all future occurrences of it.