Your best friend for file transfer.
 Fetch
Fetch
 Fetch Help > Using Fetch > Introduction to using Automator with Fetch
NOTE: Fetch 5.8 does not offer Automator support. The documentation below is only accurate for Fetch 5.7.7 and earlier. Automator support may return in a future release of Fetch.
Fetch includes a number of actions for Mac OS X's Automator, allowing you to create simple workflows that can automate a variety of Fetch tasks without having to know programming.
This help topic includes a brief overview of Automator, and step-by-step instructions for creating two simple workflows that upload and download specific files using Fetch. While only three Fetch actions are mentioned here, Fetch includes a variety of other Automator actions as well.
Automator overview
Automator lets you put together individual steps, called actions, into a complete task, called a workflow. You do not have to be a programmer to use Automator — Automator lets you assemble actions into workflows in an easy-to-use graphical interface. You can then save these workflows and run them to perform the same task over and over again, without having to set it up each time.
When you open Automator, it will ask you to select a template or starting point for a new workflow. For creating workflows that automate Fetch, you should select the default template ("Custom" or "Workflow" depending on your version of Mac OS X), and click the Choose button. Then Automator will show a new, blank workflow window:
![]()
There are two lists on the left side of the window — the Library list, showing categories of similar Automator actions, and the Action list, showing the actions that belong to the selected category. To view the actions that belong to a certain category, click the category's icon in the Library list. The Fetch actions are in the Internet category.
To create an Automator workflow, you drag actions from the Action list to the big workflow area on the right side of the window. Most actions require additional information — they have buttons, fields, and pop-up menus that you should use to tailor the action to the needs of your task.
To see what each action does, select the action in the Action list, and read the action description in the lower-left corner of the window. You can also see an action's description by clicking the Description label at the bottom of the action.
As you add actions, they will join up to form the workflow — you will see triangles leading from one action to the next. To remove an action from your workflow, click the Delete (x) icon in the action's title bar.
This is only a brief summary about Automator, which should give you enough information to get started. The Automator Help book, available in the Automator application by choosing Help > Automator Help, provides much more information and has an excellent walk-through of creating Automator workflows. You may also want to read the Mac OS X help topics on Automator.
Uploading files workflow
Follow these steps to create an Automator workflow that uploads specific files or folders from your Macintosh to a server. This can be useful if you frequently upload the same set of files, or if you want to set up scheduled uploads using iCal.
- Open Automator (located in your Applications folder). When prompted, click the Choose button to create a new "custom" workflow. A new workflow window should open automatically. If it does not, choose File > New.
- In the new workflow window, click the Files & Folders icon in the Library list.
- Drag a Get Specified Finder Items action from the Action list to the workflow area on the right side of the window.

- In the Get Specified Finder Items action, click the Add button to add a file or folder to the list of items to be uploaded. When you click the Add button, a file selection prompt will appear. Choose the first file or folder you want to upload. Its name and path will appear in the Get Specified Finder Items' list.
- Use the Add button to add as many files or folders as you want.
- Next, click the Internet icon in the Library list.
- Drag an Upload Files action from the Action list to the workflow area, placing it after the first action. (You may have to scroll the list to find the Upload Files action.)
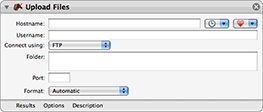
- In the Upload Files action, enter the connection information for the server and remote folder (if any) you want to upload the files to, or choose a recent connection or shortcut from the pop-up menus.
- Finally, save the workflow as an application. Choose File > Save As. In the Save dialog, choose Application from the File Format pop-up menu, and then enter a name and choose a location to save your workflow.
Now, when you open the workflow, it will automatically open Fetch and upload the items you specified to the server you specified.
If the connection to the server requires a password, you will be prompted for it when you use the workflow. If you do not want to be prompted for the password, you should save the password for the connection in your keychain.
If you want to edit your workflow later, drag the workflow's icon to the Automator application icon.
Downloading files workflow
Follow these steps to create an Automator workflow that downloads specific files or folders from a server to your Macintosh. This can be useful if you frequently download the same set of files, or if you want to set up scheduled downloads using iCal.
- Open Automator (located in your Applications folder).When prompted, click the Choose button to create a new "custom" workflow. A new workflow window should open automatically. If it does not, choose File > New.
- In the new workflow window, click the Internet icon in the Library list.
- Drag a Get Specified Fetch Items action from the Action list to the workflow area on the right side of the window.
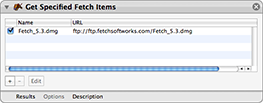
- In the Get Specified Fetch Items action, click the Add (+) button to add a remote file or folder to the list of items to download. When you click the Add button, a dialog similar to Fetch's New Connection dialog will appear.
- Enter the connection information for the server where the file is stored, and a path to the item. (A path is the description of a file or folder's location that includes the folders the item is in, for example, "www/pictures/dog.jpg" is the path to the file "dog.jpg" that is in the folder "pictures" that in turn is in the folder "www". )
- Use the Add (+) button to add as many files or folders as you want.
- Next, drag a Download Fetch Items action from the Action list to the workflow area, placing it after the first action.
![]()
- In the Download Fetch Items action, click the pop-up menu to choose the folder on your Macintosh where you want the files to be saved. If you do not want to use any of the listed folders, choose Other to select any folder on your Macintosh.
- Finally, save the workflow as an application. Choose File > Save As. In the Save dialog, choose Application from the File Format pop-up menu, and then enter a name and choose a location to save your workflow.
Now, when you open the workflow, it will automatically open Fetch and download the items you specified to your Macintosh.
If the connection to the server requires a password, you will be prompted for it when you use the workflow. If you do not want to be prompted for the password, you should save the password for the connection in your keychain.
If you want to edit your workflow later, drag the workflow's icon to the Automator application icon.
More information and more examples
The two examples above are very simple examples of how you can use Automator with Fetch, using only a few of Fetch's Automator actions.
Other Fetch Automator actions let you rename, delete, or move files around on a server; set the permissions of items on a server; and filter items so that you download only items that meet a certain criterion and ignore other items. (There is also a Finder action for filtering Finder items, so that you upload only items that meet a certain criterion.)
For more information about each Fetch Automator action, see the Automator actions help topic.
For more examples of things you can do with Automator and Fetch using slightly more complex workflows, see the more examples of using Automator With Fetch help topic. It includes instructions of how to create workflows that batch change permissions of files on a server, download all files on a server that were created today, and more.